
Zoning a Studio Apartment Without Permanent Walls
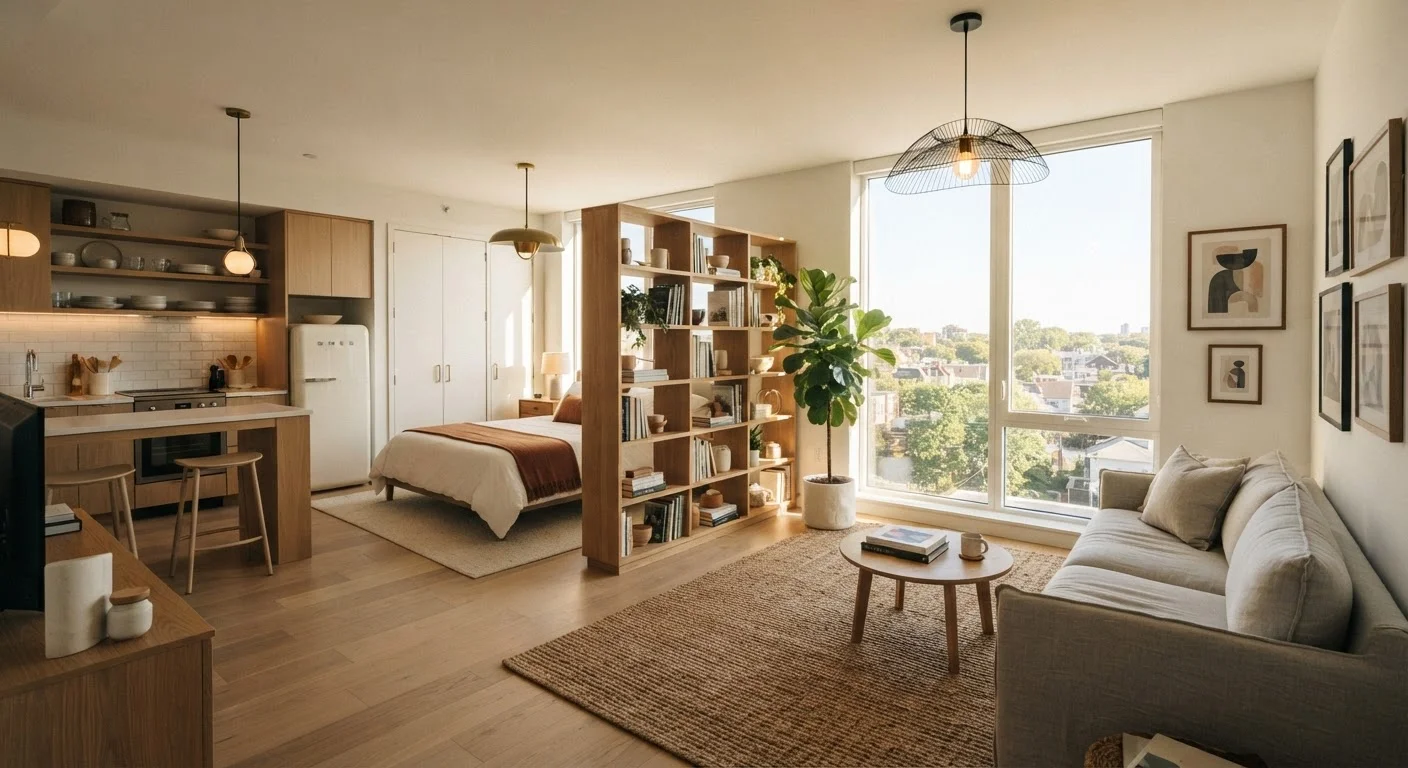
Photo credit: InsightsGrove.com | Discover Joy In Reading
In this article
Room dividers, rugs, lighting, and furniture placement can carve a studio into distinct zones. A practical walkthrough of the most reliable methods.
Key Takeaways
- Area rugs are the single fastest way to visually anchor separate zones in a studio.
- Furniture orientation - not just placement - signals where one zone ends and another begins.
- Lighting layered by zone reinforces the psychological separation between living and sleeping areas.
- Freestanding bookshelves and curtains create division without damaging walls or risking a security deposit.
- A floor plan sketch before moving furniture saves time and prevents layout dead ends.
Why Zoning Matters in a Studio
A studio apartment collapses every function of a home - sleeping, working, cooking, relaxing - into a single room. Without deliberate zoning, the space reads as one undifferentiated area, which makes it harder to mentally switch off work, wind down before bed, or feel like you have anywhere to go when you need a change of scenery.
Zoning is not about carving up square footage - it's about giving each activity its own visual cue. Research in environmental psychology consistently links distinct spatial cues to cognitive state shifts, meaning a clearly defined sleep area genuinely helps your brain treat it differently from a work area. The good news: none of this requires a landlord's permission. For a broader framework on what renters can and cannot do, see how tenure shapes your design options.
Tape measure
Confirms furniture fits each zone before you move anything heavy.
Graph paper or free floor-plan app
Lets you test layout ideas digitally before committing to physical rearrangement.
Area rugs (one per zone)
Visually anchors each zone and defines its footprint on the floor plane.
Freestanding bookshelf or open shelving unit
Creates a physical and visual barrier between zones without wall attachment.
Ceiling-mounted curtain track or tension rod
Allows a fabric panel to divide sleeping and living areas on demand.
Plug-in pendant or floor lamp
Adds zone-specific lighting without any electrical work.
Step-by-Step: Creating Your Zones
Before moving a single piece of furniture, complete your prerequisites: measure the room, note door swings and window positions, and decide which zones you actually need. Most studios function best with three: a sleep zone, a living/lounge zone, and a work zone. A dining zone can double with either of the last two.
Sketch your floor plan and assign zones on paper
Draw the room to scale on graph paper or use a free app. Mark windows, doors, outlets, and any fixed features like a kitchen island. Assign a rough footprint to each zone - sleeping typically needs the most floor space, while a work zone can be compact. This step prevents the frustration of moving a sofa twice.
Anchor each zone with a distinct area rug
Area rugs are the fastest and most reversible zoning tool available. A rug visually communicates 'this is a separate space' even when no physical barrier exists. Choose rugs that are large enough for all key furniture legs to sit on or just inside the border - undersized rugs undermine the effect. Contrasting textures (e.g., a jute rug in the living zone and a plush rug in the sleep zone) reinforce the distinction.
Orient furniture to face inward toward each zone
The back of a sofa is a natural room divider. Positioning a sofa with its back toward the sleeping area - rather than pushed against a wall - creates an implied boundary without blocking light or airflow. Similarly, angling a desk to face away from the bed signals a shift in activity. Furniture direction is a low-cost, high-impact tool.
Add a freestanding divider for zones needing more separation
If your sleep zone needs stronger visual privacy - especially if guests visit the living area - a freestanding open bookshelf or a hanging curtain panel is the most practical solution for renters. Open bookshelves divide space without making the room feel enclosed. A ceiling-mounted curtain track (using a tension system that doesn't require drilling) allows the divider to be pulled aside entirely when not needed.
Layer lighting to reinforce zone identity
Overhead lighting treats the whole studio as one room. Zone-specific lighting - a plug-in pendant above the dining area, a warm-toned floor lamp beside the bed, a cooler task lamp at the desk - tells your eyes (and brain) which mode you're in. Plug-in fixtures require no electrical work and move easily. Use dimmer adapters on floor lamps to adjust ambiance without rewiring anything.
Test the layout for a full week before finalizing
Live in the new arrangement for five to seven days before buying any additional furniture or rugs. Notice friction points: Is it awkward to move from the bed to the bathroom? Does the work zone feel too exposed? Adjustments at this stage cost nothing. Once satisfied, do a final audit using the room-by-room audit checklist to confirm no space is being wasted.
Common Pitfalls and How to Avoid Them
The most frequent mistake is over-zoning. Trying to carve four or five distinct areas into 400 square feet produces a cluttered, chaotic result. Limit yourself to three zones maximum - if dining is a daily priority, let it share the living zone with a small folding table rather than claiming its own footprint.
A second common error is treating the floor plan as fixed. Studios reward experimentation. If your first layout puts the work zone next to the bed, you may find it hard to stop checking email at night. Swap positions before assuming the layout is permanent.
Use Matching Colors to Unify, Contrast to Divide
If two zones share the same wall color and rug tone, they'll visually merge even with a bookshelf between them. A simple way to reinforce separation is to use a consistent accent color within each zone - a throw pillow, lamp shade, or plant pot - that doesn't repeat in the adjacent zone. This costs very little and has a surprisingly strong effect on how distinct each area feels. For renter-safe wall color options, see paint vs. peel-and-stick wallpaper for renters.
Finally, don't neglect the vertical dimension. Tall bookshelves pull the eye upward and make ceilings feel higher while doing dividing work at eye level. For a full treatment of this principle, see how to use vertical space in small apartments.
Once your zones are set, you may also want to think about carving out a small fitness area - the small-space fitness guide covers layout approaches that work without dedicated floor space.
Don't Block Natural Light or Ventilation
Tall room dividers placed in front of windows can cut natural light to one zone entirely, making the space feel smaller and darker overall. Position dividers parallel to windows rather than perpendicular, and choose open shelving or sheer curtain panels that allow light to filter through. Good airflow matters too - solid barriers close to HVAC vents can create uncomfortable hot or cold spots.

Author
Home & Living Editorial Team
Home & Living Editorial Team is the collective byline for our editorial team and contributor network. Articles published under this byline or an editorial pen name are researched, written, and reviewed according to our editorial standards for clarity, consistency, and independence before publication.
View all articles →